Download & Print
Instructions for the Manson Shotgun Barrel Wall Thickness Gauge
Manson Precision Reamers’ Shotgun Barrel Wall Thickness Gauge is designed to enable the shotgunsmith to measure—in thousandths of an inch—the thickness of 10 thru 20 Gauge barrels up to 32” long. The Gauge won’t answer the question, “Is it thick enough to be safe?” but it will allow you to determine just how thick it is. As in all gunsmithing work, if you have any doubts about the safety of an alteration requested by your customer, don’t do it! Your customer will (hopefully) thank you for it and you’ll avoid possible litigation.
Assembly, Mounting and Calibration:
Refer to sketch below in Figure 1 – The Wall Thickness Gauge (WTG) is intended to be used in a vertical position, with the Indicator Block hanging down and the Base Block mounted against a wall or hanging from a bracket. Procedure is as follows: 1–assemble the WTG, less Indicator to a wall mount or a bracket mount; 2—assemble the Indicator to the Indicator Block, align the Plunger with the Contact Ball, zero the Indicator.
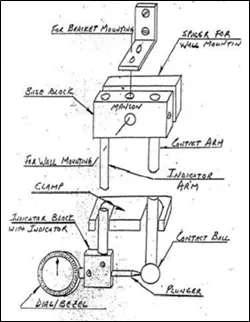
Figure 1
Wall Mounting:
Cut a spacer at least 1” thick to be used as shown in the sketch and drill a 21/64” hole through its center. Chose a wood screw sufficiently long to reach through the Base Block and Spacer and anchor the WTG securely to the wall. Drill a hole in wall of the proper size for the screw and mount the WTG to the wall, with the Spacer sandwiched between. Please skip to the section on assembly/ alignment/zeroing of the Indicator.
Bracket Mounting:
This method does not require a Spacer, but uses the mounting hole in the Base Block between the Arms of the WTG. If hanging from a bracket, select a 5/16” machine screw long enough to run through the Base Block and Bracket, with threads enough for washers and nut. Select a wall location that will allow the WTG to be used conveniently, mount the Bracket securely to the wall and assemble the WTG to the Bracket.
Assembly, Alignment and Zeroing the Indicator:
Any dial indicator used with the WTG must be of the plunger type, with at least .200” of travel. Further, its mounting stem must fit the 3/8” reamed hole in the Indicator Block and be long enough for the plunger to reach the Contact Ball. If you intended to use your own Indicator, but later determined it wouldn’t work, we can supply a suitable unit.
Mount the Indicator in the Indicator Block as shown in the previous sketch, making sure its Plunger touches the Contact Ball at the point closest to the Indicator Block. If adjustment is required, loosen the set screw (1/8” allen key) securing the Indicator Block to the Indicator Arm, make the needed adjustment and re-tighten the set screw.
Move the Indicator closer or further away from the Contact Ball to adjust the “zero” position on the Indicator. Ensure the Indicator has at least a .050” preload, when touching the Contact Ball, so it will follow variations in barrel wall thickness. Snug the set screw on the Indicator stem to hold the Indicator at this point and check to see the Plunger moves freely. THIS SET SCREW MUST NOT BE OVER TIGHTENED AS THIS COULD CRUSH THE INDICATOR STEM AND RUIN THE INSTRUMENT. Re-zero the Indicator, if required, by turning the Dial/Bezel so “0” aligns with the pointer when the Plunger is resting on the Contact Ball.
Use of the Wall Thickness Gauge:
Having checked that the Indicator is zeroed, a barrel to be measured is held in the right hand and the Plunger held far enough off the Contact Ball with the left to allow the barrel to be slipped over the Contact Arm. The Plunger is released to contact the outside of the barrel being gauged and both hands are then used to move the barrel past the Plunger, while maintaining gentle contact of the barrel I.D. with the Contact Ball. Too much pressure against the Contact Ball can cause the Contact Arm to bend slightly, resulting in a thinner-than-actual reading. The wall of the barrel is “pinched” between the Plunger and Contact Ball to give a direct reading on the Indicator of the wall thickness at point of contact. Barrels up to 32” long may be gauged over their entire length by first measuring one half, reversing the barrel, and measuring the other half.
Note to Left-handed ‘smiths: you may wish to mount the WTG with the Indicator Block on the right so the barrel will be held against the Contact Ball with your left hand and the Plunger held to clear the barrel with your right.
Making Consistent Thickness Readings: Because of flexing of the Arms, we recommend taking several readings at the same point when gauging a barrel. The more consistent the readings, the more confidence you’ll have in their accuracy. Oftentimes, barrels need only be gauged for 3 or 4 inches behind their muzzle prior to the installation of screw-in choke tubes. These instances don’t require the full 16” reach of the WTG–if desired, the set screws in the Base Block securing the Arms may be loosened, the Arms slid further into the Block and the screws re-tightened to make the assembly more rigid (original design).
Alternatively, we now manufacture a reinforcing Clamp (new design)–pictured on page 1– which may be pressed over the Arms to assist with rigidity. Clamps are included with all new orders for Wall Thickness Gauges; if your WTG was ordered before we offered Clamps, please call or email us and we’ll send you one for the price of shipping.
Whether you move the Arms further into the Base Block, or use the Clamp in order to achieve greater rigidity of the unit, you will likely have to re-zero the Indicator—this usually requires moving only the Dial/Bezel.
This tool, like all of our products, is warranted to be free from defects in material and workmanship. If it’s not right, we’ll make it right or refund the purchase price. If you have any questions about its use, or suggestions as to how it could be made better, please contact us.