Download & Print
Manson Precision Reamers designed the Cartridge Comparator to make life easier for the advanced shooter and re-loader by allowing precise headspace measurements of ammunition, cases and chambers. With this information the re-loader will be able to fine-tune clearances between his ammunition and chamber, with resultant improvements in accuracy and case life.
The primary functions of the Cartridge Comparator are:
- Measure headspace of factory or reloaded ammunition
- Quantify chamber headspace by measuring headspace of fired cases
- Ensure minimal shoulder set-back when setting up reloading dies
Knowing the headspace of factory or reloaded ammunition can be useful in diagnosing accuracy or functional problems of a rifle. Further, by measuring headspace of a fired case, the shooter can come very close to knowing the headspace of the chamber in which the round was fired.
This information can be useful if he has several rifles in the same caliber and wants to know if the same reloads may be used in all of them, or if one has significantly different headspace and should use reloads made with a different die setting.
Finally, reloaded cases last longer and locate more consistently within the chamber with minimal re-sizing—you don’t want to push the shoulder back more than necessary for proper chambering. This is also true of shouldered rimmed and belted cases and the Cartridge Comparator provides a means of setting your dies to achieve minimal resizing.
The Cartridge Comparator is similar to an indicator stand in that it consists of a base, column and indicator holder. The indicator holder carries a .001” plunger-type Dial Indicator, with a 3/8” flat contact button, and can be raised or lowered relative to the base and locked in place as required.
The base carries a Base Datum, which locates individual Datum Blocks central to the Dial Indicator’s shaft.
The Comparator is supplied with a 1.000” reference Gauge Block and Datum Blocks of precise inside diameters and length. Each end of a Datum Block has the datum diameter of that end etched on it.
The Gauge and Blocks are used in conjunction with the supplied Cartridge List to determine headspace of factory or reloaded rounds and fired cases. The Base Datum in the Comparator’s base serves as a .560” Datum Block—used when measuring headspace of extra-large calibers.
Important:
The datum diameter specified on the “Cartridge List” for a particular cartridge must be used when measuring headspace for that cartridge or incorrect headspace values will result. As an example, if checking 223 cases, the shoulder of the case, round or gauge must bear on the end of the Datum Block marked .330”.
Using the Manson Precision Cartridge Comparator:
Select the appropriate Datum Block—as given in the Cartridge List–for the case/round/gauge you’re measuring. Ensure that all surfaces of the Datum Block and Base Datum (on the Comparator base) are clean and place the Block in the Base Datum.
Please note that the datum diameter given on the List may not be the same as specified in SAAMI for a particular cartridge. Many different datum diameters are used commercially; in order to keep the required Datum Blocks to a reasonable number, we’ve converted headspace dimensions of some chamberings to use the more common datum diameters.
Call or email us if you have questions about this.
Checking Cartridges Against a Headspace Gauge:
- Move the Indicator Holder up until the Indicator Button will allow the proper headspace gage to be placed in the Datum Block nose down.
- Lower the Indicator Holder until the Button just contacts the base of the gage and the pointer of the Indicator moves to a little past 12 o’clock—lock the holder in place with the thumbscrew, being careful not to over-tighten.
- Rotate the Datum Block until the headspace gauge settles into the Block and the pointer no longer bounces or wobbles. It’s important that only the Datum Block rotates and doesn’t rock. Your fingers should not contact the gauge as this may prevent it from seating properly in the Datum Block. If necessary, re-adjust the Indicator Holder so the Pointer is near 12 o’clock.
- Fine-adjust the Indicator to read “0” by turning the bezel until the “0” on the Indicator dial is aligned with the large Indicator Pointer.
- Raise the Indicator Button, remove the headspace gauge and place the cartridge/case to be measured in the Datum Block. Lower the Indicator Button onto the case head.
- Rotate the Datum Block until the cartridge/case settles, as was done with the headspace gauge (step #3). When the Indicator Pointer stops moving, you can accurately determine the headspace by noting how much, plus or minus, the case differs from the headspace gauge and adding or subtracting the difference from the dimension of the gauge.
The above procedure can be used to compare new cartridges or cases, re-sized/ reloaded cartridges or cases and fired cases to each other.
Special Note Concerning Measurement of Fired Cases:
Many fired cases exhibit slightly protruding primers, primers showing cratering into the firing pin hole in the breech, or both. These conditions need to be taken into account or false headspace measurements may result.
Protruding Primer—often the result of chamber headspace being longer than headspace of the cartridge. Occurs when the firing pin pushes the round forward in the chamber and the primer then backs out when full pressure is realized and the case grips the chamber walls, preventing it from fully contacting the breech face.
In this situation, chamber headspace must be measured from the shoulder to the rear of the protruding primer. Cratering of the Primer—if the primer has not backed out and metal has extruded into the hole in the breech face, the “splash” must be removed before gauging headspace to achieve a true measurement.
This can be done by flat-filing/sanding the protruding material or simply decapping the case, being careful not to expand the neck, which could cause shoulder movement. If both the above conditions exist, remove the protruding primer material without changing the location of the primer and take headspace measurements including the protruding primer.
Checking Cartridge/Case with Headspace Greater than 1”, Without Comparison to a Headspace Gauge:
- The Dial Indicator has 1” of useable travel; if the cartridge/case to be measured has a case head-to-datum length of over 1” (see Cartridge List), use the following procedure:
- Select the 1.000” solid Gauge Block and place it on top of the appropriate Datum Block in the Datum Seat. If 2 blocks are needed to achieve the required height (Case-Head-to-Datum-Block greater than 2”), the solid Block should be on top of the top Datum Block so the Indicator Button bears on a solid surface. All Gauge and Datum Blocks are ground to 1.000” long.
- Lower the Indicator Holder until it just touches the Gauge Block and the Pointer moves a little past 12 o’clock; tighten the thumbscrew to hold it in position.
- Adjust the bezel of the Indicator until the Pointer is at Zero and remove the 1.000” Gauge Block.
- Raise the Indicator Button to allow a cartridge or case to be placed into the Datum Block—bullet or case mouth down. Rotate the Datum Block until the cartridge/case settles.
- Read the amount on the Indicator and add this to the 1.000” from the Gauge Block (2” if two blocks are required). Note that the large Indicator dial measures .100” for each revolution of the large Pointer; the small dial measures .500” for each revolution of the small Pointer. It is important to note how many revolutions these Pointers have made.
Checking Cartridges/Cases with Headspace Less than 1”:
- Place the appropriate Datum Block for the cartridge/case being measured in the Base Datum, with the 1.000” Gauge Block on top.
- Lower the Indicator Holder until the entire 1” of useable travel has been taken up and the Pointer reads approximately 12 o’clock; tighten the thumbscrew and set the bezel to “0”.
- Raise the Indicator Button, remove the 1.000” Gauge Block and gently lower the Button to the Datum Block. The Dial Indicator will now read “0” at the height of the Datum Block used with the cartridge/case being measured.
- Raise the Button to allow the cartridge/case to be placed in the Datum Block. Without touching the cartridge/case, rotate the Datum Block until the cartridge/case settles into the Block and the Dial Indicator no longer moves.
- Counting the number of revolutions of the small Pointer(.500” per rev.) and adding it to the number of revolutions of the large Pointer(.100” per rev.) will give the headspace dimension.
Using the Cartridge List:
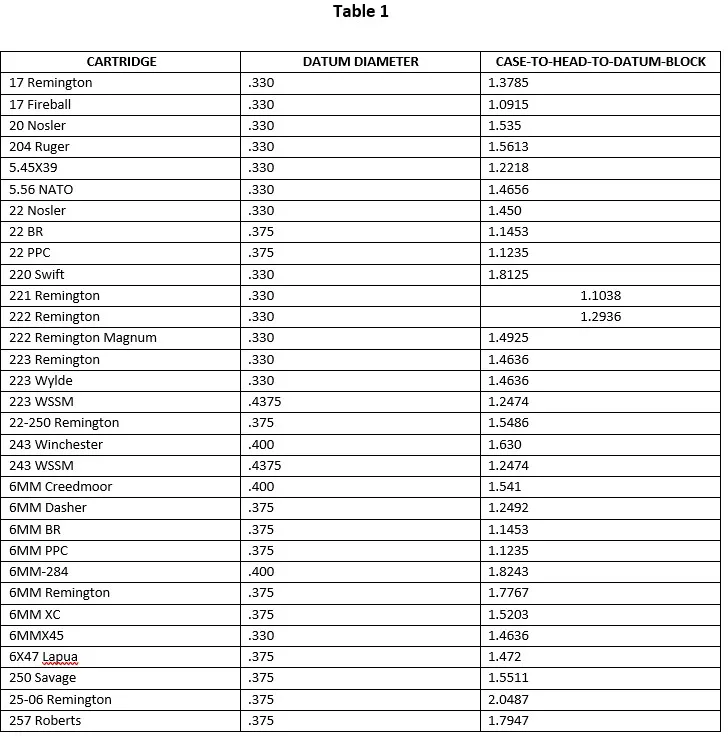
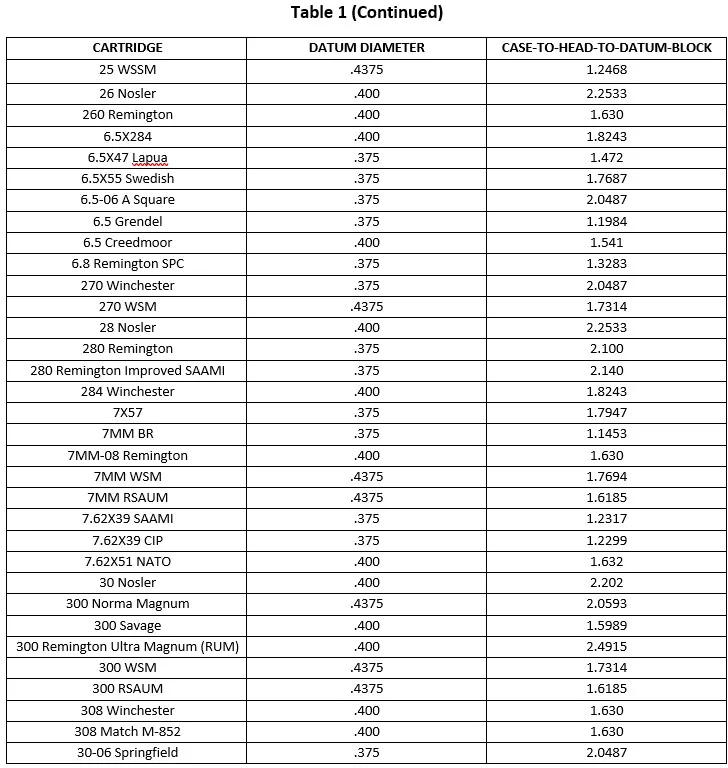
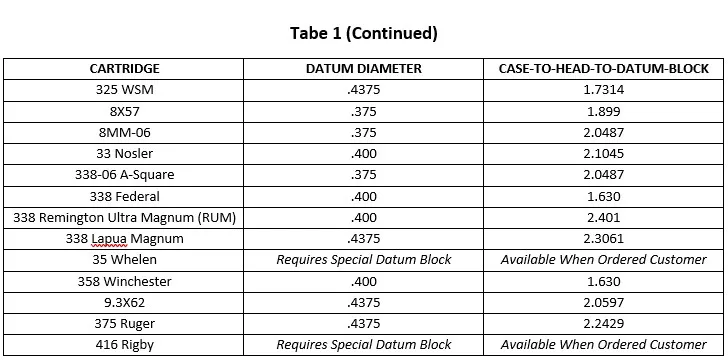
Below in Table 1, is a list of our stock headspace gauge offerings, along with the “GO” (minimum) headspace dimension. GO dimensions appear under the heading “Case-Head-toDatum-Block”.
When using the Comparator to measure a cartridge or case without a headspace gauge, these are the numbers you should use. If the dimension indicated is more than 1”, but less than 2”, use a single 1-inch Block as described in the instructions under the heading “Checking Cartridge/Case Without a Headspace Gauge”.
If the Case-Head-to-Datum-Block dimension is greater than 2”, stack 2 1-inch Blocks. The dimension to the right of the decimal point (example- .630” for 308 Win) will register on the Dial Indicator if the cartridge/case is at minimum headspace. Less than .630” is under minimum, greater than .630” is over minimum.
When measuring a cartridge or case—after setting up the Comparator per the instructions—add the actual number observed on the Indicator to 1” for each Datum/Gauge Block used to determine your cartridge headspace.
The Indicator has a measuring range of 1 inch; all of the readings from the Indicator should begin with a decimal point. In the above example (308 Win), a reading of .628” would be added to 1.000” to arrive at a headspace dimension of 1.628”–.002” shorter than minimum.
Bear in mind these are minimum chamber headspace dimensions, which generally correspond to the maximum cartridge headspace dimension.
If you have a non-standard chamber, and Manson Precision Reamers made your chambering reamer, we can provide you with the correct headspace dimensions.
Our Cartridge Comparator—like all products from Manson Precision Reamers—is covered by our Warranty. Contact us if you have any problems and we will make it right. Likewise, please call if you have any suggestions as to how this, or any other of our products may be improved.